
A fun and easy way to add style to any baby shower is by folding napkins in themed shapes. Whether you're using paper or cloth napkins, these baby shower napkin folding ideas take only a few minutes and make a big impact on guests.
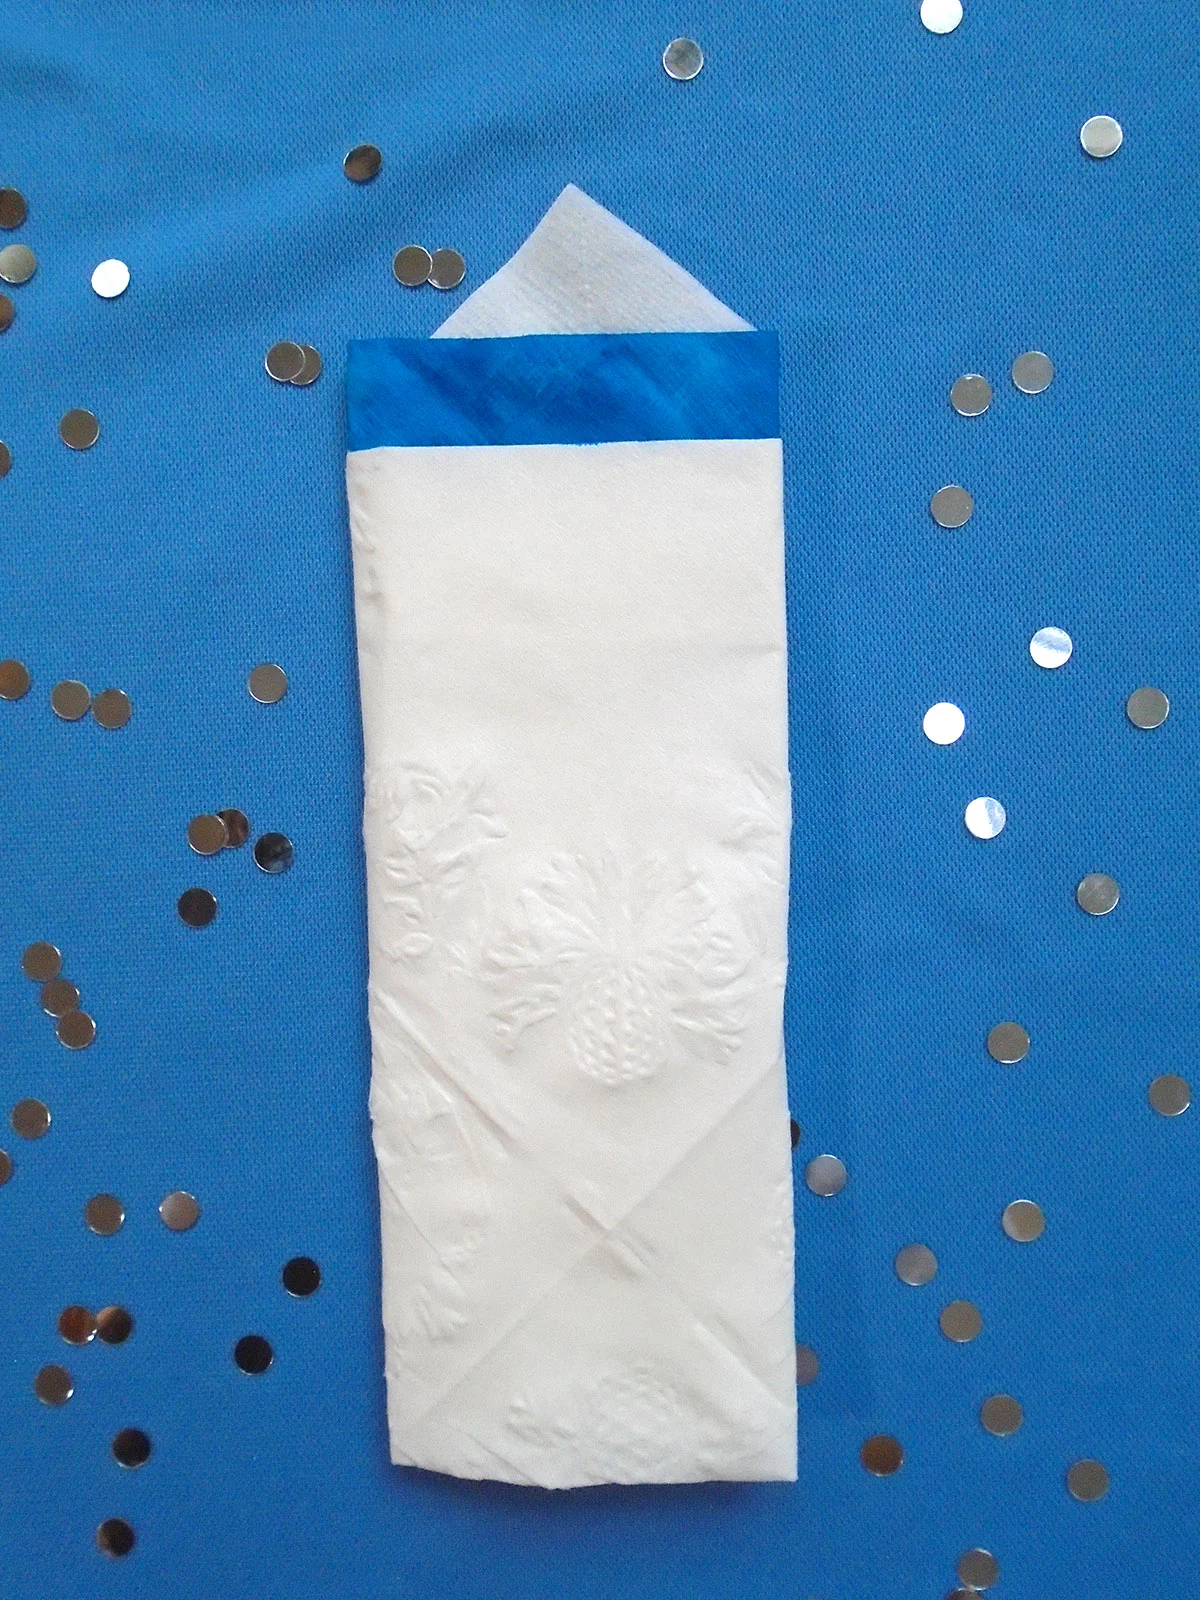
Baby Bottle Fold
Shower hostesses on a budget will love this simple fold that works best with white paper luncheon napkins. Use any color marker to embellish the rim of the bottle so it matches your shower theme. While you can use other colored napkins, white mimics the look of formula. You can use cloth napkins with this fold, but you'll probably have to iron after each fold to help it hold in place, and you won't be able to add color to the rim.
Instructions
- Start with the napkin opened all the way and situated on the diagonal in front of you so it looks like a diamond.
- Fold the top point down so the dip touches the middle of the napkin and crease the edge.
- Looking at the top flat edge of the napkin where you just creased it, place your fingers on either side of this flap about 1.5 inches down from the top. Fold the point of this flap back up starting from this point.
- Fold the tip of this flap back down about one inch. Bottle fold steps two through four
- Take the bottom point of the napkin, closest to you, and fold it up so the tip of this piece sticks about half an inch higher than the top of your napkin.
- Fold the left point in toward the middle so the point meets the flap you just folded.
- Repeat step six with the right point. Bottle fold steps five through seven
- Start on the left side and fold the whole napkin over in a 1.5-inch rectangle. Do the same thing two more times so it lines up on top of the middle of the napkin. Bottle fold step eight
- Repeat step eight with the right side of the napkin.
- Carefully flip the whole napkin over and crease the edges until it lays flat.
- Color the rim of the bottle with a marker if desired.
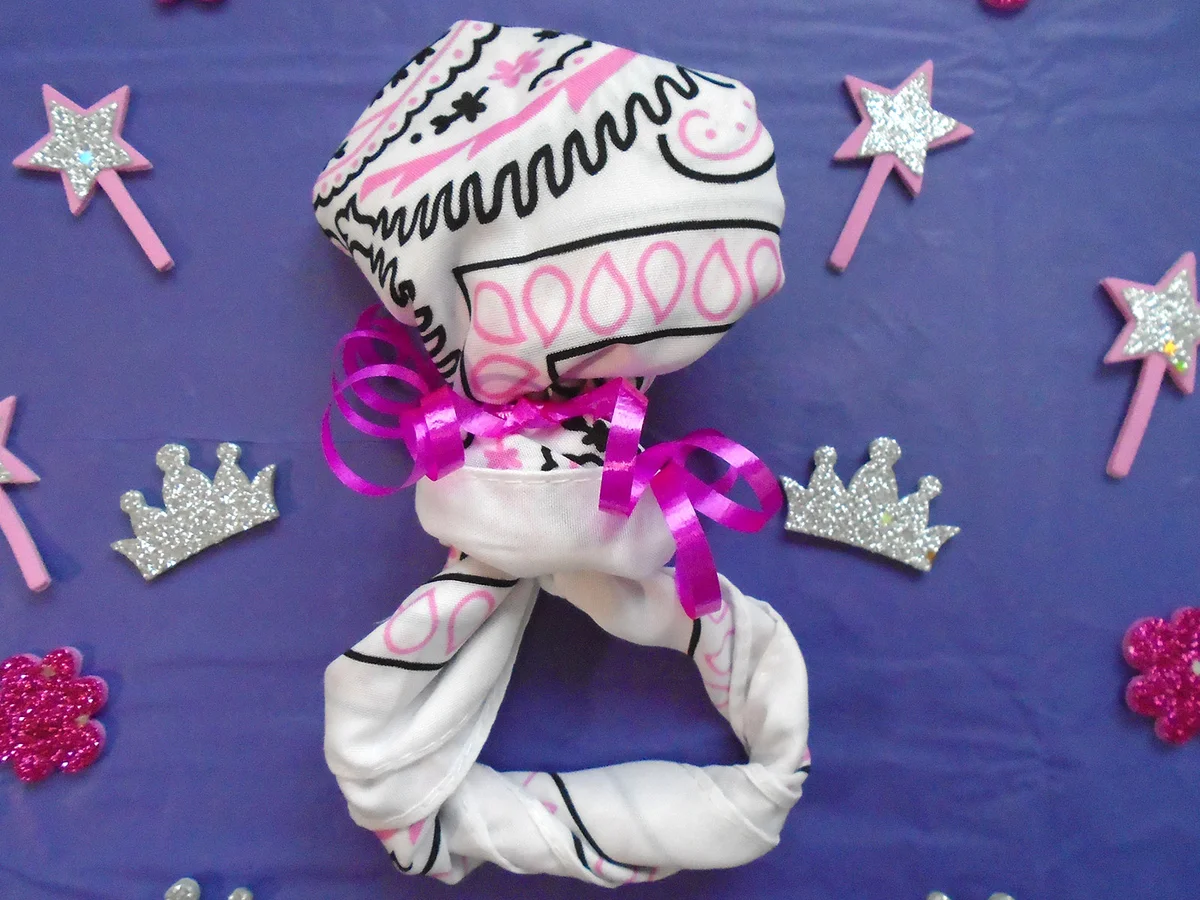
Rattle Fold
Baby-inspired items serve as a great inspiration for any shower theme for boys and girls. This baby rattle fold looks unique and elegant at more formal showers. Cloth napkins work best for this fold since you'll be doing some twisting to create the handle and the fabric will hold up better than paper. Use any color napkin or a patterned bandana and embellish the rattle part with ribbon to make it more festive.
Instructions
- Start with the napkin opened all the way and situated on the diagonal in front of you so it looks like a diamond.
- Fold the bottom point up to meet the top point and crease the bottom edge.
- Fold the top point (both layers) down about three inches.
- Starting from the bottom, flat edge fold up the entire napkin about one inch. Keep hold of this section and roll up, one inch at a time, about five times until the entire napkin forms one long line. Rattle fold steps two through four
- Pick up the napkin in the center and tie the whole thing in a loose knot, making sure the knot is close to the center of the napkin.
- Face the flat side of the knot toward you and hold the whole thing so the short length is above the knot and the longer one is below it. Rattle fold steps five through six
- Take the shortest end of the napkin and fold it down behind the knot, wrap it around the other length as close to the bottom of the knot as you can. Tuck the end in to hold it in place.
- Stick your fingers inside the knot and pull out some of the knot to make it a larger, rounder shape. Rattle fold steps seven through eight
- Twist the long piece of the napkin and tuck the end of it in the back of the part you wrapped in the last step.
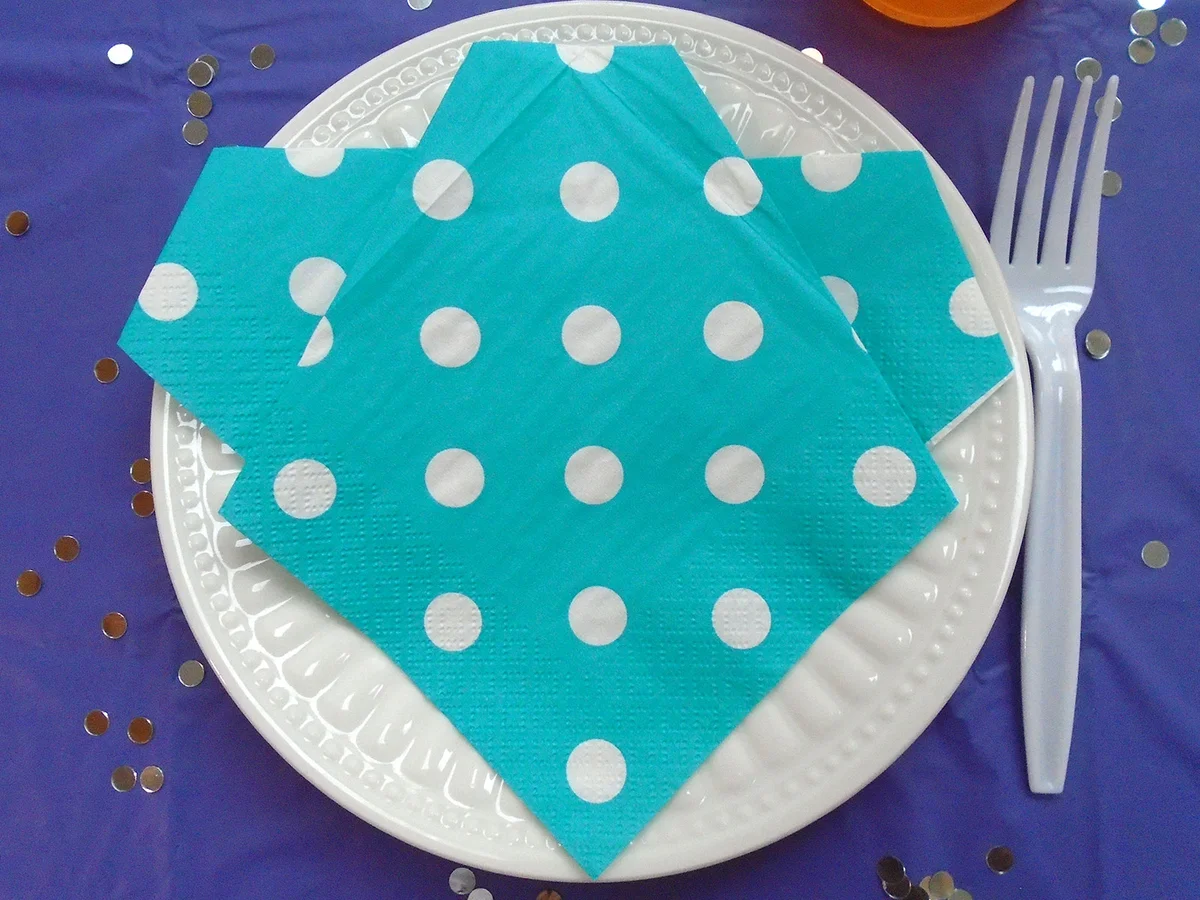
Onesie or Gown Fold
This fold looks more complicated than it is, which will leave guests amazed at your hidden talent. Use a white or yellow napkin to get a gender-neutral look or try a frilly napkin in girly colors to make it look more like a baby dress. If you use a cloth napkin, you'll need to iron after every fold to help it stay in place. Paper napkins work great with this fold, especially patterned ones with polka dots or stripes.
Instructions
- Start with the napkin opened all the way and situated on the diagonal in front of you so it looks like a diamond.
- Fold the top point down to meet the bottom point. Crease at the fold. Try to line up all edges, but if they seem uneven you want the top layer to be slightly inside the bottom layer edges.
- Grab the left point and pull it over and down so the point touches the right edge. Crease the fold on the left side. Onesie fold steps two to three
- Starting from the left, flat edge place one finger about half an inch in from the edge. Fold the point of this piece back and crease it where your finger is.
- Take the same point and fold it back toward the center so the tip reaches the inside creased edge of this flap. Crease the left edge. The top edge of this flap should be in a straight horizontal line. Onesie fold steps four and five
- Repeat steps three through five with the right point/side. Onesie fold step six
- If you want to know how to fold a napkin into a baby dress, pull the bottom corner up an inch or so. This creates a flat bottom that looks more like a dress. Use scissors to cut off the bottom half of the arms for a better dress silhouette.
- Carefully flip the whole napkin over.
Baby Bootie Fold
Baby accessories like a bow tie napkin fold are expected, so look for other apparel items to get inspired by. The baby bootie napkin fold is great for smaller showers or announcing a pregnancy at an intimate family dinner. This baby napkin folding technique works best with paper napkins because the stiff material helps the booties keep their 3-dimensional shape. Add some mini ribbon laces or accents around the ankle to embellish these classic ruffled booties. The larger the napkin, the larger the boots will be. These tiny booties were made with 10-inch by10-inch napkins.
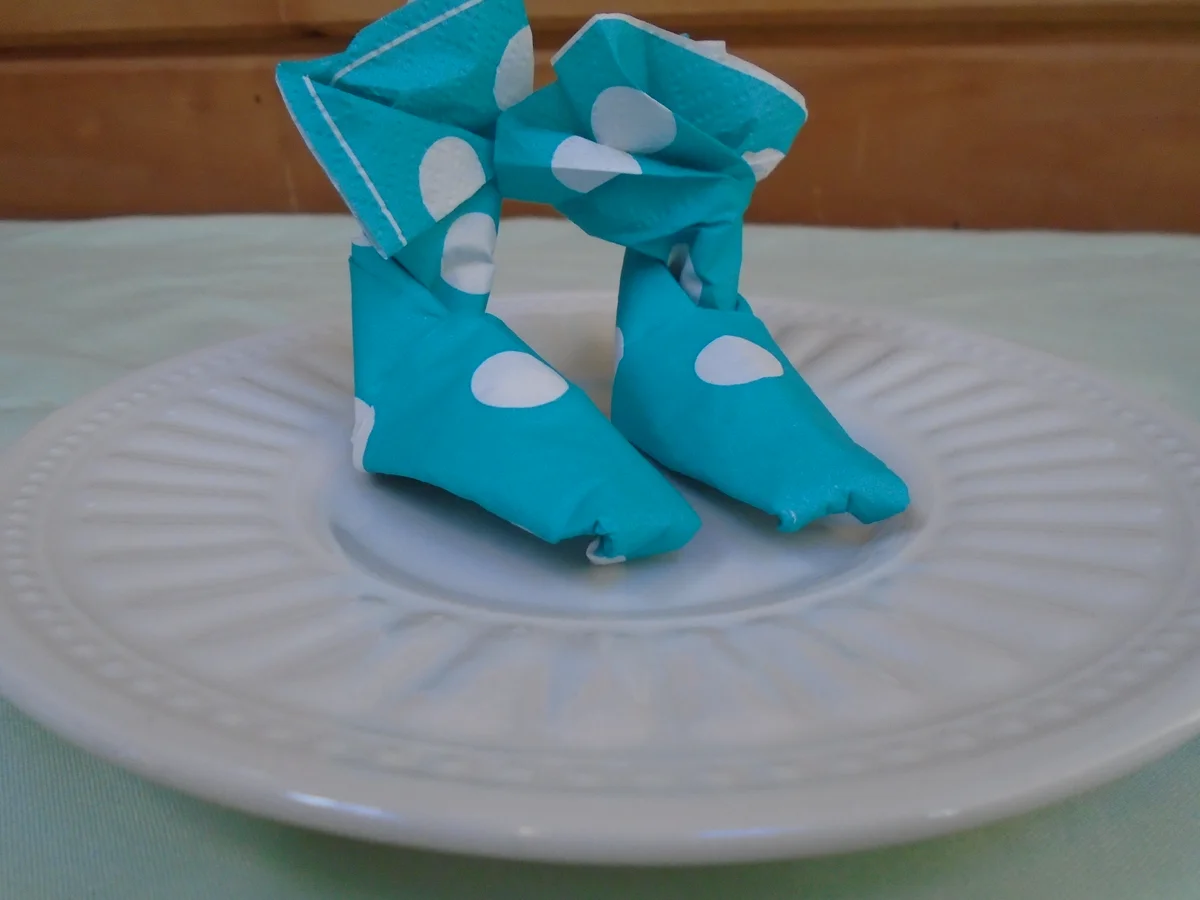
- Open the napkin all the way and lay colored-side down on a flat surface.
- Fold the bottom two corners straight up to the center line of the napkin.
- Fold the top two corners straight down to the center line of the napkin. Bootie fold steps two and three
- Fold the napkin in half at the center line so you end up with a thin horizontal napkin.
- Face the open edge of the napkin away from you.
- Pull the bottom right corner up and in until the inside edge of that piece lines up with the center of the napkin. Bootie fold step six
- Repeat with the bottom left corner so you have a house shape.
- Face the point away from you so you are looking at an upright house with a roof shape. Bootie fold steps seven and eight
- Fold the right side point in to the center line. Bootie fold step nine
- Repeat with the left side point.
- Face the napkin sideways so the point faces to your left. It should look like a paper airplane.
- Fold the entire bottom half of your triangle up and flush with the top edge.
- Flip the whole napkin over so the open edge is facing you.
- Using the right side of the top layers only, fold straight up twice.
- Hold this in place with your left hand and use your right hand to fold the right side of the bottom layers only down twice. Bootie fold steps eleven to fifteen
- Pull the right corner of the bottom section in and tuck it into the fold near the center. Bootie fold step sixteen
- Stand the bootie up and tuck the point under so the toe area is flat, not pointed.
- Pull apart some layers at the top to create the ruffles.
- Make a second bootie and display as a pair.
Diaper Fold
Cloth napkin folds for baby showers typically include the classic diaper napkin fold. Learning how to fold a napkin into a diaper takes only three simple steps and a diaper pin for embellishment. If you want to know how to make paper diapers for a baby shower game or table setting, use the same directions from the cloth version with white paper napkins.
It's All in the Details
When planning a baby shower you want the experience to be unique and memorable for the mom-to-be and her guests. Adding in fun details like adorable baby shower napkins ideas helps keep the atmosphere special for everyone.